
Backward Design Lesson Planning That Saves You Time
We’ve all been there: staring at a blank lesson plan template, the pressure mounting to create something engaging and effective. The usual approach—grabbing a textbook chapter or a fun activity to build a lesson around—often feels like a shot in the dark. The lessons might look good on paper, but they can end up feeling disconnected and don't quite hit the learning target, leaving you and your students feeling frustrated.
This is exactly why backward design lesson planning is such a game-changer. It’s a simple but powerful shift in thinking that saves you time and reduces stress: you start with the end goal first.
Why Traditional Lesson Planning Might Be Burning You Out

Does this situation ring a bell? You find a fantastic science experiment online and pour your energy into building a lesson around it. But afterward, you realize it barely connected to the core standard you were actually supposed to be teaching.
Or maybe you spend hours crafting an elaborate project, only to find that your students completed it without ever truly grasping the "big idea" behind their work.
This is the classic pitfall of planning forwards. We get so fixated on the "what"—the activities, the worksheets, the mountain of content—that we lose sight of the "why." This creates a frustrating cycle of planning, teaching, and re-teaching that can leave you feeling drained and unproductive.
The Content Coverage Trap
One of the biggest culprits of teacher stress is that constant pressure to "get through" the material. When you plan the traditional way, it’s easy for your lesson plan to become a checklist of topics instead of a thoughtful journey toward genuine student understanding.
- Focus on Activities, Not Outcomes: When we lead with the activity, we risk creating lessons that are engaging but ultimately aimless. The fun can easily overshadow the learning objective.
- Misaligned Assessments: If you create the test after teaching, you might end up assessing what was done in class rather than what was truly learned. This is where those surprising gaps in student comprehension often appear.
- Time-Consuming Revisions: When a lesson doesn't land right, you're left scrambling to adjust on the fly or spending your precious evening hours re-planning for the next day.
This constant hustle is a direct path to burnout. But what if you could plan with a clear destination from the very beginning? For more ideas on reclaiming your schedule, check out our guide on effective teacher time management strategies.
The problem with traditional planning isn't a lack of effort. It's the absence of a clear, guiding purpose from the start. By flipping the script, you can save an incredible amount of time and reduce the mental load of constantly having to course-correct.
A More Purposeful Approach
This is exactly the problem that backward design sets out to solve. The framework, developed by educators Grant Wiggins and Jay McTighe, is all about that fundamental shift in perspective. Instead of starting with your inputs (like textbook pages), you begin with the outputs: what you want your students to know and be able to do by the end.
Research has shown that this method improves the alignment between learning goals and assessments by over 50% compared to traditional planning. It makes your instruction far more targeted and relevant.
By defining your destination first, every other decision—from the assessments you use to the activities you plan—becomes clearer and more intentional. It’s not just an educational buzzword; it’s a practical strategy to cut down on planning stress and create far more meaningful learning experiences for your students.
Starting with Your Destination in Mind
The first step in backward design lesson planning is probably the most liberating part of the whole process. It gives you permission to forget about the activities, textbook chapters, and handouts for a moment.
Instead, you start by asking one deceptively simple question: What must my students truly understand and be able to do when this unit is over?
This single question fundamentally changes your role. You’re no longer just covering material; you’re an architect of understanding. You're setting a clear destination before you even think about drawing the map to get there.
Identifying Your Big Ideas
Every unit has its essential concepts—the non-negotiables. The trick is learning to separate the "nice-to-know" details from the "need-to-know" big ideas. These are the core understandings that have value beyond the classroom, the ones that will stick with students years from now.
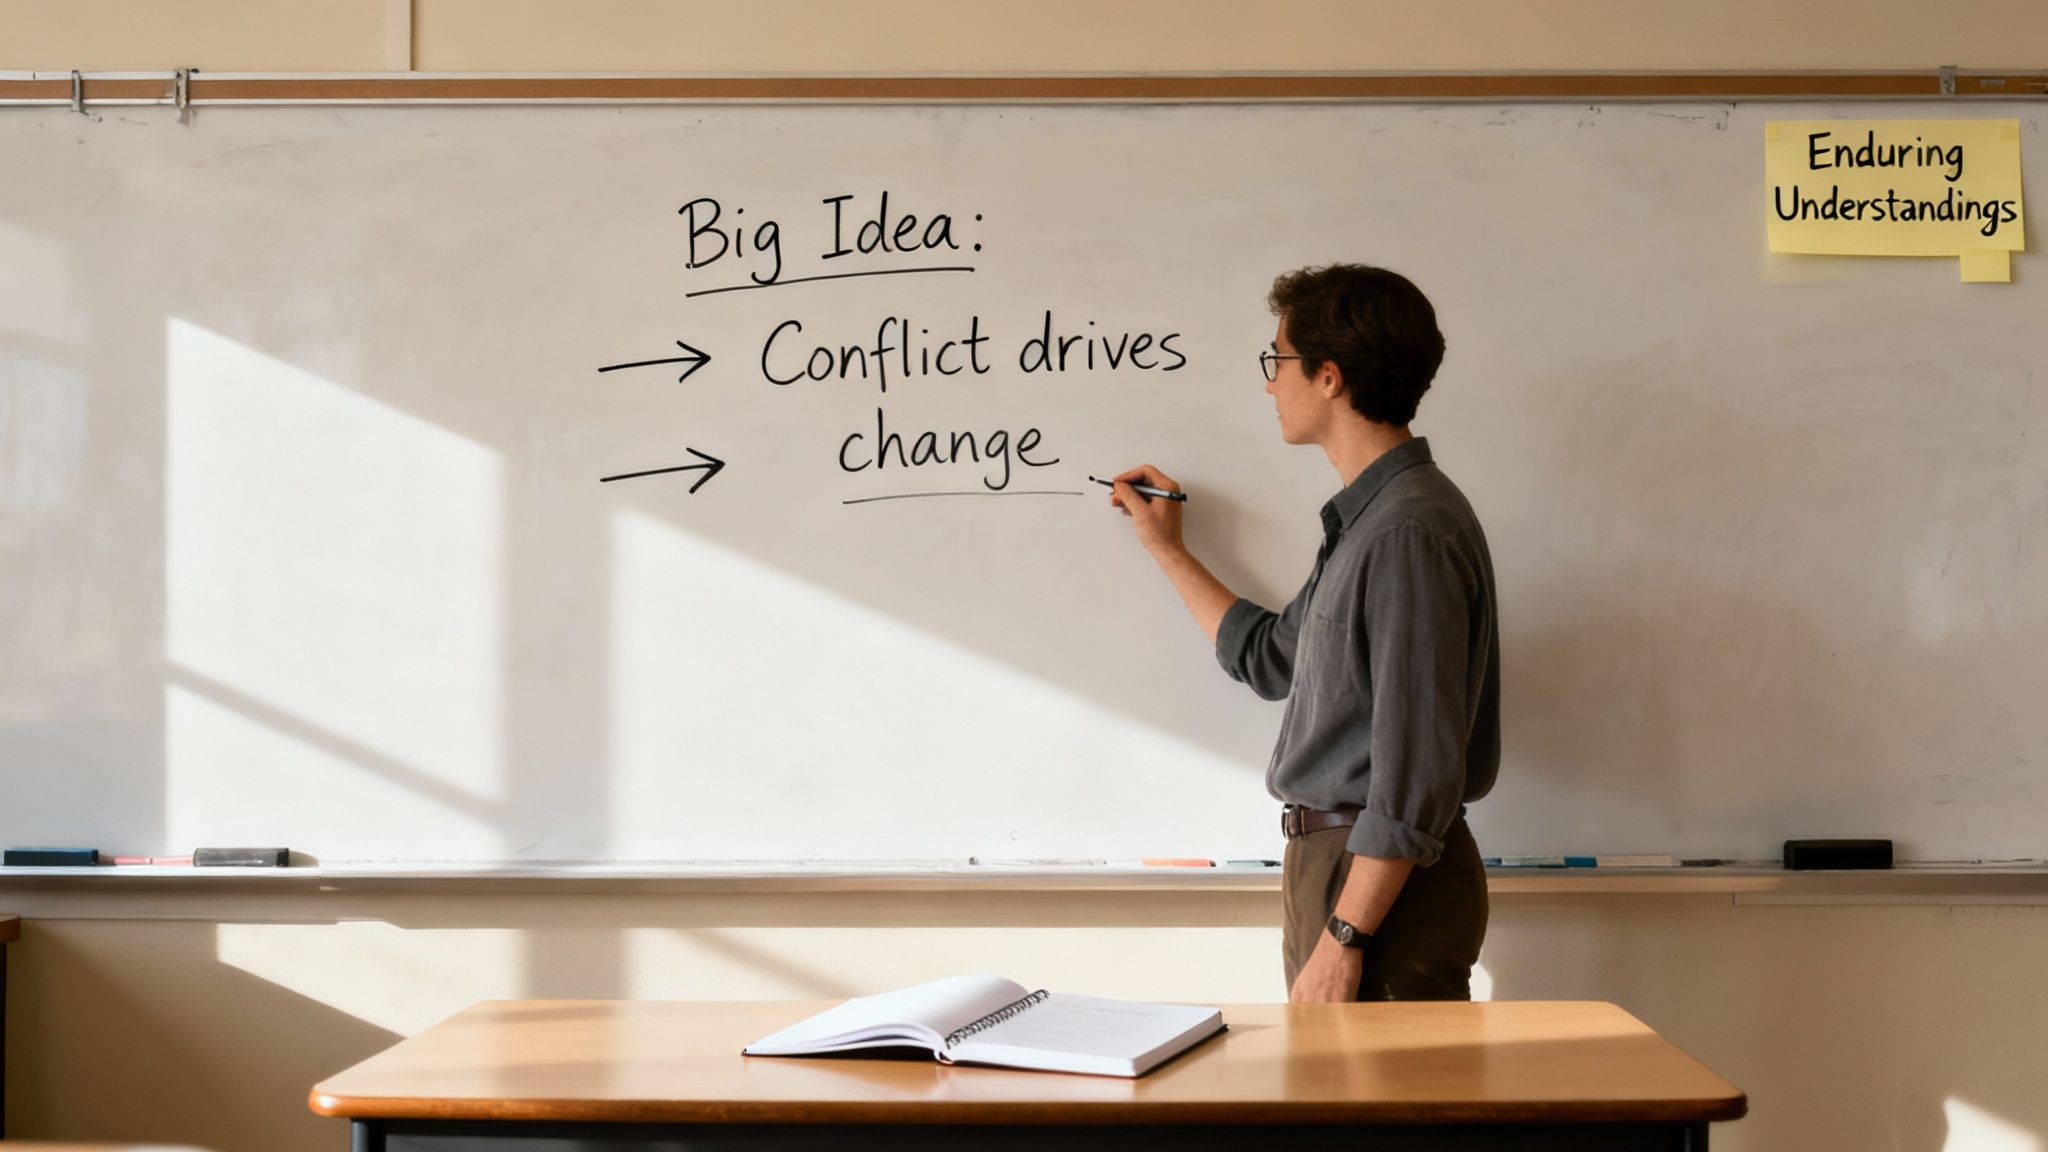
Think about it this way. "The Civil War" is just a topic. It's a massive container for facts, dates, and names. But an enduring understanding like, "Conflict often drives profound social and political change," gives your unit a real, transferable purpose. Suddenly, the facts of the war serve a much bigger idea.
If you’re just getting started, it can be helpful to explore powerful lesson plan models, including UbD to see how others structure this kind of goal-setting. These frameworks can give you a solid foundation.
From Topics to Enduring Understandings
Let’s get practical. How does this shift look in different subjects? The goal is to move from a general topic to a specific, conceptual understanding that students can carry with them.
-
Science Example:
- Topic: Ecosystems
- Enduring Understanding: All organisms in an ecosystem are interconnected, and a change in one part can affect the entire system.
-
Literature Example:
- Topic: Romeo and Juliet
- Enduring Understanding: Hasty decisions driven by intense emotion can lead to tragic and unforeseen consequences.
-
Math Example:
- Topic: Fractions
- Enduring Understanding: A fraction represents a part of a whole, and understanding this relationship is key to solving real-world problems involving division and proportion.
See the difference? These understandings are timeless. They answer the "so what?" of your unit before you even begin.
When you define the enduring understanding first, you're not just teaching content; you're teaching students how to think about that content. This is the foundation of creating lessons that have a lasting impact.
Guiding Questions to Find Your Focus
I know what it’s like. You’ve got a packed curriculum, and pinpointing these big ideas can feel overwhelming. When I get stuck, I use a few key questions to filter out the noise and find what’s truly essential.
- What is the "big idea" that will stick with students in five years? This forces you to look past the upcoming test and focus on long-term learning.
- What essential questions will this unit help students answer? For an ecosystems unit, you might ask, "Why should we care if one type of frog goes extinct?"
- What common misconceptions do students have about this topic? Knowing these up front allows you to design instruction that tackles them head-on.
- What real-world skills will students actually use? This links the academic work to practical skills like critical thinking, problem-solving, or clear communication.
Once you have solid answers to these questions, you’re ready to write down 1-3 enduring understandings for your unit. These statements become your North Star, guiding every single decision you make from here on out.
This initial stage of backward design requires some deep thinking, but the investment pays off tenfold. It takes the guesswork out of daily planning because you always know your destination. Your lessons become more focused, your assessments more meaningful, and your teaching far more purposeful. You’re no longer just covering material—you’re leading students toward genuine, lasting comprehension.
Defining What Success Actually Looks Like

Now that you've pinpointed your destination, it's time to figure out what it looks like when your students have arrived. This is where backward design lesson planning really flips the script on how most of us were taught to plan.
Instead of creating a test at the end of the unit, you're going to design your assessments right now—before you even think about a single activity or worksheet. It feels a bit strange at first, I know. But trust me, making this one shift will bring incredible focus and efficiency to your planning.
Moving Beyond the Multiple-Choice Test
Let's be honest, when we hear "assessment," our brains usually jump straight to a final exam or a bubble-sheet test. While those have their place, the real goal here is to gather "acceptable evidence" of learning in a way that reflects the big goals you just set.
If your enduring understanding is for students to "evaluate the effectiveness of climate change legislation," a multiple-choice quiz on dates and policy names just won’t cut it. That doesn't show evaluation; it shows memorization. You need an assessment that lets them demonstrate the skill of evaluating.
This means we need to broaden our definition of evidence. Think of it as a whole toolkit:
- Performance Tasks: These are the big, authentic challenges where students apply what they've learned. We're talking about Socratic seminars, detailed lab reports, formal debates, or a final presentation for a project-based unit.
- Informal Checks: These are your daily snapshots of understanding. Quick things like exit tickets, think-pair-share discussions, and quick polls give you valuable real-time data.
The idea is to build a complete picture of student learning with different types of evidence, not just rely on a single, high-stakes test at the end. For a deeper dive into crafting clear goals for these assessments, check out our guide on creating powerful lesson plan objectives.
Gathering "Acceptable Evidence" of Learning
The core principle is simple: choose an assessment that directly measures the verb in your learning goal. If the goal is for students to analyze, they need to do something more than just recall facts. If they need to create, they need a task that allows them to build something new.
This isn't just theory. A 2018 survey found that 82% of middle school teachers felt backward design helped them create better assessments because it clarified their goals from the start. They also spent 25% less time on fluff content, and their schools saw a 12-15% boost on standardized tests tied to those goals.
By designing your assessments first, you ensure that every learning activity you plan from this point forward has a clear and direct purpose: to prepare students for success on this specific task. No more busywork, no more wasted time.
Modern tools can be a huge help here. For instance, you can create quizzes from PDFs using AI to generate quick formative checks in minutes, freeing up your valuable planning time for more creative work.
Matching Assessment Types to Learning Goals
So, how do you pick the right tool for the job? The best method always aligns directly with your learning goal. Using a simple table can help you visualize the connection and make smarter decisions during your planning.
| Learning Goal Type | Best Assessment Method | Example |
|---|---|---|
| Factual Recall | A short, low-stakes quiz or a quick Q&A session. | "Students will identify the key figures of the Harlem Renaissance." |
| Conceptual Understanding | A concept map, a 'think-pair-share' discussion, or an exit ticket. | "Students will explain the relationship between supply and demand." |
| Application & Analysis | A case study analysis, a document-based question, or a lab report. | "Students will analyze a primary source document for author bias." |
| Creation & Synthesis | A project-based assessment, a formal debate, or a multimedia presentation. | "Students will design a solution to a local environmental problem." |
When you lay it out like this, it becomes clear that a one-size-fits-all assessment strategy just doesn't work. By thoughtfully selecting your evidence before you plan your lessons, you guarantee that your teaching will be laser-focused on what truly matters. It saves you time and takes the stress out of last-minute test creation.
Weaving Your Lesson Plan Together
This is where the magic happens. You’ve already done the heavy lifting by figuring out your destination (your learning goals) and how you'll know when students have arrived (your assessments). Now, you get to map out the actual journey—the day-to-day learning experiences.
Instead of scrambling for activities and hoping they lead somewhere meaningful, you’re now building a clear, intentional path. You're connecting the dots for your students, creating a bridge from what they currently know to what they need to master.
A fantastic mental model for this stage is the WHERETO framework, another gem from Wiggins and McTighe. Think of it less as a rigid checklist and more as a series of signposts to make sure every activity you plan has a real purpose.
Getting the Journey Started on the Right Foot
Before you can ask students to tackle the tough stuff, you have to get them invested. They need to see the "why" behind the "what." This is where the first two parts of the framework are crucial.
- W - Where are we going and why? Let students in on the secret! Be transparent about the big goals. Show them the essential questions and even give them a sneak peek at the final performance task they'll be working on. When students know the destination, they're much better travel companions.
- H - Hook them and hold their interest. You need a powerful opening to grab their attention from the get-go. This isn't just about a fun icebreaker; it's a strategic move to connect the topic to their world or spark some genuine curiosity.
Imagine you're starting a science unit on ecosystems. You could kick things off with a provocative question like, "What would happen to our town if all the bees disappeared tomorrow?" Suddenly, an abstract concept like "interconnectedness" feels personal, immediate, and urgent.
Giving Students the Tools They Need
With your students hooked, it's time to start equipping them for the challenges ahead. This is the ‘E’ in the framework, and it’s where the bulk of your teaching, modeling, and guided practice will live.
This is the Equip stage. Think of it as filling their toolkits with the essential knowledge, vocabulary, and skills they'll need to succeed on that final assessment you designed earlier.
Every activity should be a direct answer to the question, "How does this help my students prepare for the final performance task?"
- Preparing for a debate on climate change legislation? They’ll probably need mini-lessons on constructing a logical argument, practice analyzing data from charts, and maybe even some low-stakes public speaking exercises.
- Writing a lab report on chemical reactions? They'll definitely need direct instruction on lab safety, a chance to get comfortable with the equipment through guided practice, and a clear example of what a great report looks like.
One of the biggest time-savers that comes with backward design is the freedom to ditch the 'fluff.' If an activity, no matter how fun, doesn't directly build a skill or piece of knowledge needed for the assessment, you can confidently let it go.
Making the Learning Stick
The last part of the WHERETO framework is all about deepening understanding and making sure the learning is accessible to everyone. This is how you move students from just "getting it" to truly owning their new knowledge.
The final letters—R, E, T, O—guide this crucial phase:
- R - Rethink, Revise, Reflect: Build in structured moments for students to look back on their work and initial ideas. This could be anything from formal peer feedback sessions to quick journal prompts asking them to reflect on what they’ve learned or what’s still confusing.
- E - Evaluate along the way: This isn't about the final grade. It’s about using those quick formative checks you planned—like exit tickets or observations—to get a pulse on where students are. This data tells you when to slow down, when to speed up, and who needs a little extra support.
- T - Tailor to diverse needs: With a clear goal in mind, differentiation becomes much more manageable. You can easily offer different articles on the same topic, provide sentence starters for students who struggle with writing, or create complex extension activities for those who are ready for a bigger challenge.
- O - Organize for optimal learning: The sequence of your lessons matters. You want to start with the foundational concepts and gradually build toward more complex applications. This scaffolds the experience, helping students feel supported and confident rather than overwhelmed.
When you follow a purposeful structure like this, your lessons stop feeling like a series of disconnected events. They become a coherent, powerful story that guides students directly toward mastery, making your planning time more effective and your teaching more impactful.
Bringing It All Together with AI Planning Tools
Understanding the theory of backward design is a great start, but the real magic happens when you translate that theory into a practical, time-saving lesson plan. Let's walk through a complete example to see how the pieces connect, and then explore how AI can help you do this faster and more effectively.
Imagine you're creating a science unit for your 4th-grade class. The old way might be to pull out a textbook or a favorite worksheet on food chains. With backward design, we flip that script entirely.
A Worked Example: A 4th-Grade Ecosystems Unit
We're going to think about the end goal first. What's the one big, sticky idea we want students to carry with them long after the unit is over?
Stage 1: Identify Desired Results
This is our destination. We have to know where we're going before we start the car.
- Enduring Understanding: Students will understand that all parts of an ecosystem are interconnected and that a change in one part can impact the entire system.
- Essential Questions: How do living things depend on each other to survive? Why should we care if one animal or plant disappears from an area?
Stage 2: Determine Acceptable Evidence
With our destination set, we now need to figure out what it looks like when students have "arrived." How will they prove to us—and to themselves—that they truly get it?
- Performance Task: Students will create a diorama of a local ecosystem, like a pond or forest. The key part is the "Impact Report" they'll write to go with it. In this report, they must explain what would happen to three other organisms in their diorama if one key species were suddenly removed.
This task goes way beyond just memorizing vocabulary. It forces them to apply the concept of interconnectedness.
Stage 3: Plan Learning Experiences
Now we can finally think about the day-to-day lessons and activities. Every single thing we plan from this point on is deliberately chosen to build the skills and knowledge students need to succeed on that final performance task.
- Hook: We could start with a "mystery box" containing clues from a local ecosystem (a feather, a cool rock, a pressed leaf) to get them curious and asking questions.
- Equip: This is where we deliver the necessary knowledge. We might use direct instruction for key vocabulary like producer, consumer, and decomposer. We'll have them read short articles on food webs and watch engaging videos of local wildlife.
- Rethink: To really cement the idea, we could do a "web of life" activity. Each student represents an organism, and they hold strings connecting them to what they eat and what eats them. It's a powerful visual.
This approach ensures that every activity, from the fun hook to the final assessment, is tightly aligned and serves a clear purpose. And it works. A major meta-analysis found that backward design lesson planning boosted student learning retention by an average of 20%.
Streamlining Planning with AI
This is where things get really exciting for time-strapped educators. AI assistants can become your tireless planning partner, saving you hours of work when building a unit like this. Instead of wrestling with a blank document, you can use a few smart prompts to get fantastic starting points for every stage.
For a deeper dive into the specific tools available, check out our guide on AI-powered lesson planning tools.
The WHERETO framework, a key part of backward design, helps structure these learning experiences. This infographic shows how it all flows together.
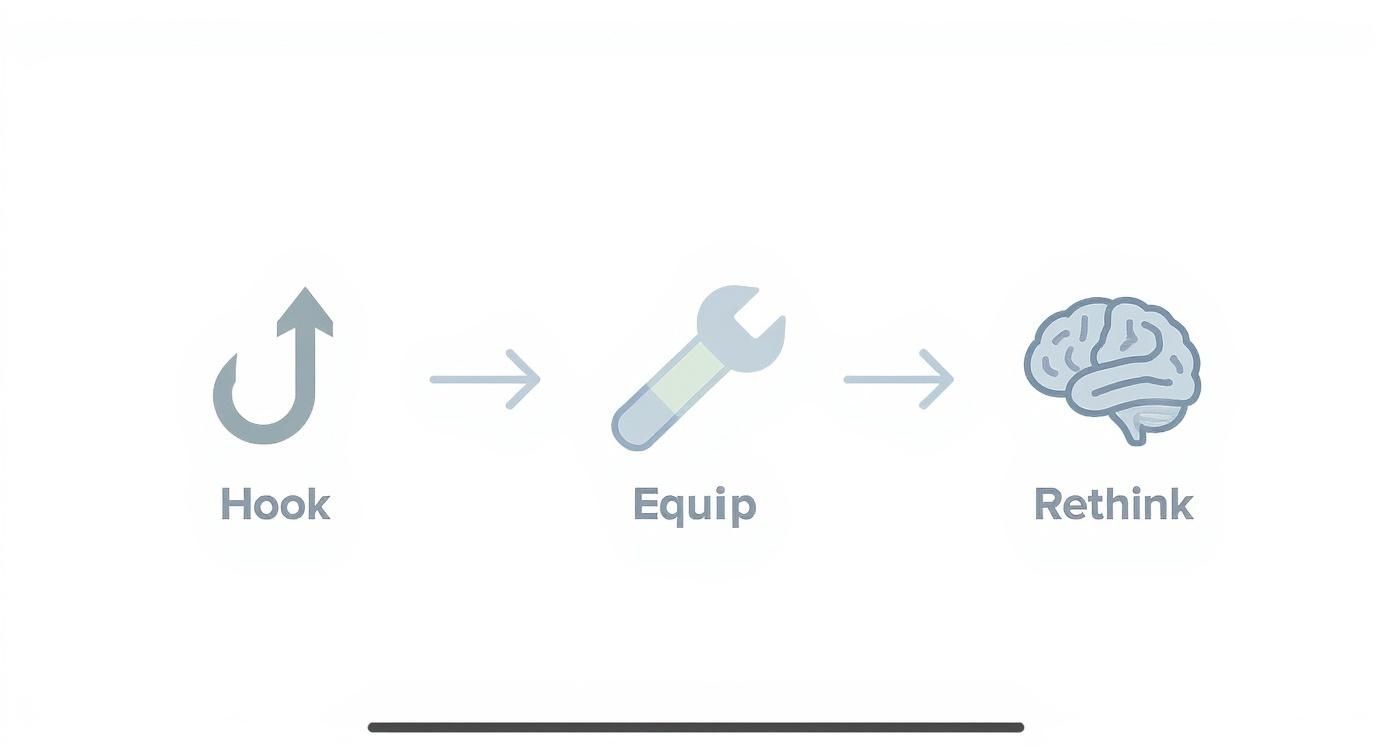
As you can see, each step naturally builds on the last, creating a purposeful and cohesive journey for your students.
By letting AI handle the initial brainstorming and drafting, you can save hours of foundational work. This frees you up to focus on the most important part of your job: adapting, refining, and delivering incredible learning experiences for your students.
To get you started, here are a few practical, copy-and-paste prompts you can use with tools like ChatGPT or Gemini to jumpstart your own backward design process.
AI Prompts for Backward Design Lesson Planning
These prompts are designed to give you a strong first draft for each stage of the backward design process. Simply copy, paste, and then tweak the results to fit your specific classroom needs.
| Backward Design Stage | Example AI Prompt |
|---|---|
| Stage 1 (Goals) | "Act as a 4th-grade curriculum designer. Generate 3 enduring understandings and 4 essential questions for a science unit on ecosystems, focusing on the concept of interdependence." |
| Stage 2 (Assessments) | "Design a creative performance task for 4th graders to assess their understanding of ecosystem interdependence. Include a simple, 4-point rubric to evaluate their work." |
| Stage 3 (Activities) | "Brainstorm 5 engaging learning activities for a 4th-grade ecosystems unit. Include a hook activity, two hands-on explorations, and one reflective closing activity." |
Remember, AI is a partner, not a replacement. It provides a solid foundation, which you can then infuse with your own expertise and creativity to make the lessons truly come alive for your students.
Frequently Asked Questions About Backward Design
Switching to a new method like backward design is bound to bring up some questions. It's a real shift in thinking, so it's completely normal to wonder how it plays out in the day-to-day reality of the classroom. Let's tackle some of the most common questions I hear from fellow educators.
Many educators look at the upfront work and think, "Who has time for this?" And they're not wrong—it asks for more thoughtful planning at the start. But trust me, it's a classic case of slowing down to speed up later.
Isn't This Way More Time-Consuming?
Yes and no. While backward design demands more heavy lifting before you start a unit, that initial time investment pays you back tenfold. Once you’ve locked in your goals and how you'll measure them, you eliminate that Sunday night scramble for activities you hope will connect to your standards.
Daily lesson planning suddenly becomes much easier. You already have the roadmap. Think of it like spending an extra hour planning a big road trip; that upfront effort is what keeps you from making wrong turns and wasting hours in frustration down the line.
By putting in the time to build a solid foundation for your unit, you save yourself countless hours during the week. Your planning shifts from frantically inventing new things every day to simply executing a clear, thoughtful plan.
How Can I Use This if I Have a Required Curriculum?
This is the big one for most of us. The good news is that backward design isn't a curriculum—it's a framework. It’s built to work with the standards and pacing guides you already have, not replace them.
Here’s how I think about it:
- Your standards are the destination. The district has already told you where you need to go.
- Backward design is your GPS. You use the process to really unpack those standards, figure out what the big, lasting ideas are, and then build the most efficient route for your students to get there.
This approach actually helps you teach the required content with more intention and depth. You're no longer just ticking boxes; you're making sure your students truly grasp the core concepts behind the standards.
Does This Kill Spontaneous Teaching Moments?
Not at all! In fact, it does the opposite. Having a crystal-clear destination makes it so much easier to take those exciting, spontaneous detours. When a student asks a brilliant off-the-wall question or a current event connects perfectly to your topic, you can dive in without worrying about getting lost.
Because you know exactly what the non-negotiable learning goal is, you can confidently steer the conversation back to the main point after exploring the side trail. The structure of backward design provides the solid ground you need to feel comfortable being more creative and flexible, not less. It’s the compass that lets you wander off the path for a bit, knowing you can always find your way back.
At Fenja Education, we're all about giving educators practical tools and strategies to cut down on stress and make planning more meaningful. Our digital downloads are designed to give you your time back. Take a look at our resources at https://fenjaeducation.net.